
Blog
How to Open a Mechanical Keyboard Switch Step by Step
The mechanical keyboard switch is the core component of a mechanical keyboard, responsible for key actuation, rebound, and tactile feedback. However, some users may encounter problems such as sticking, noise, abnormal actuation, or unsmooth rebound in a particular mechanical keyboard switch. Furthermore, some keyboard enthusiasts may need to open the mechanical keyboard switch for cleaning, lubrication, and repair, or to replace internal components such as springs and stems.
However, opening a mechanical keyboard switch is not simply a matter of disassembling the casing. Using the wrong tools or applying inappropriate force can damage housing clips, stems, springs, and even deform internal metal contacts, leading to unstable actuation.
Therefore, the correct operating sequence is crucial. This article will follow the actual disassembly process, from preparing the keycap puller, keyboard switch puller, and keyboard switch opener, to removing the keycaps, taking out the switch, opening the housing, inspecting internal components, and reassembling, providing a detailed explanation of how to disassemble the keyboard and help users understand the entire process more clearly.
What Tools Do You Need to Open a Mechanical Keyboard Switch?
Before starting disassembly, you should first prepare the correct tools.
Keycaps Puller
The Keycap Puller is primarily used to remove keycaps from the Mechanical Keyboard Switch. For large keycaps with stabilizers, such as Spacebar, Shift, and Enter, avoid pulling them out at an angle to reduce mechanical load on the stem and stabilizer components. After removing the keycap, you can directly observe the switch housing and stem to further determine the switch structure used in the keyboard.
Keyboard Switch Puller
The Keyboard Switch Puller is primarily used to remove the Mechanical Keyboard Switch from the PCB or mounting plate. In hot-swappable keyboards, the switch is fixed to the PCB socket and mounting plate, and can be removed without soldering. When using the tool, hold the switch housing with both sides, keeping it vertically upward, avoiding clamping on one side or twisting laterally to reduce stress on the housing and PCB socket.

keyboard switch puller
For soldered keyboards, the switch pins are soldered to the PCB and cannot be pulled out directly; the solder joints must be treated first. To remove the keyboard switch, it is recommended to first read the article “How to Remove Mechanical Keyboard Switches Without Damaging Your Keyboard” (insert hyperlink) for disassembly instructions.
Keyboard Switch Opener
After the switch has been removed from the keyboard, if you need to open the switch housing, it is recommended to use a Keyboard Switch Opener. Mechanical keyboard switches use housing clips to secure the top and bottom housings. Compared to forcibly prying it open with a blade or screwdriver, a dedicated opener can work on multiple securing points simultaneously, reducing scratches, clip breakage, and casing deformation, making it more suitable for frequent maintenance, lubrication, or testing.
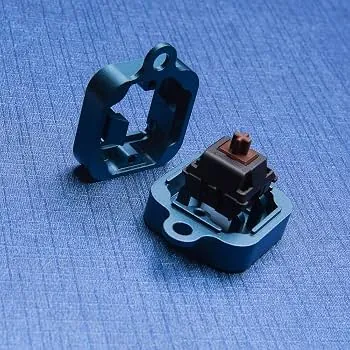
keyboard switch opener
However, the housing structure and clip positions may differ between brands, series, and mounting structures of switches. Therefore, before using an opener, ensure that the tool is compatible with the structure of the removed keyboard switch.
How to Open a Mechanical Keyboard Switch Step by Step
Step 1: Remove the Keycap
Place the Keycap Puller on both sides of the keycap, clamp it securely, and lift it upwards in a near-vertical direction to separate it from the switch stem. Avoid lateral shaking or twisting during operation to reduce lateral load on the stem. For large keycaps with stabilizers, ensure both sides are released before removing. After completion, store the keycap separately to avoid mixing it with small parts such as springs and stems.
Step 2: Remove the Keyboard Switch
For hot-swap PCBs, first confirm the installation method, then use the Keyboard Switch Puller to clamp both sides of the switch simultaneously to secure it. After releasing, remove it vertically upwards. Pay attention to the hot-swap socket during operation; avoid forcibly pulling it out if only one side is jammed, as this may increase lateral stress on the socket or PCB.
For soldered keyboards, the solder joints on the back of the PCB must be removed first to separate the switch pins from the PCB. After removal, check the pins, housing, and mounting structure for integrity before proceeding with further disassembly.
Step 3: Position the Keyboard Switch Opener
Place the switch in the corresponding position on the opener. First, confirm the tool orientation and its contact position with the housing clips before applying pressure. The opener should apply pressure to multiple mounting points simultaneously to distribute the force and reduce concentrated load on individual housing areas.
If the opener and switch housing do not match, do not attempt to forcibly disassemble by changing the angle or increasing pressure. Doing so may exceed the clip’s elasticity range, causing permanent deformation or even breakage of the clip.
Step 4: Separate the Keyboard Switch Housing
After confirming the position, gradually release the housing clips to separate the top housing from the bottom housing. When operating, control the force and speed to avoid pulling it open completely at once, which could cause components such as the Spring, Stem, and Contact Mechanism to pop out and scatter.

mechanical keyboard switch
A safer approach is to first release multiple anchor points, then slowly separate the Housing while controlling the position of the internal components. After opening, confirm that the Spring and Stem remain in their original positions and arrange the components in the order of disassembly for easier structural analysis and maintenance later.
Step 5: Remove the Internal Components
After fully opening the Housing, you can observe the internal structure of the Mechanical Keyboard Switch, including the Stem, Spring, Metal Contact Leaf, and Housing. Some products also include light guide components such as the Light Guide.
During disassembly, remove the Spring first, then the Stem, and handle the Contact Mechanism according to its structure. The Spring provides the main spring force; avoid popping it out and losing it during removal. The geometry of the Stem may be directional; maintain its original orientation after removal. Metal contact leaves are precision elastic metal parts. Their position, angle, and preload can affect contact switching. Therefore, they should not be bent or adjusted arbitrarily during cleaning or inspection to avoid altering the original electrical behavior.
What Should You Check After Opening a Keyboard Switch?
After opening the switch, do not immediately reassemble it. This stage is actually a crucial opportunity to determine if there are any mechanical problems with the switch.
Inspect the Stem and Spring
First, check the stem surface for wear, burrs, deformation, or foreign objects. Dust and debris can increase friction between the stem and housing, causing abnormal pressing resistance or rebound.
Check the spring for bending, misalignment, or deformation. Its length, diameter, and elasticity affect operating force and return force. Incorrect installation position can also affect the pressing feel. If you need to replace the spring or stem, ensure that the new component matches the size and structure of the existing housing; do not choose based solely on appearance.
Inspect the Contact and Housing
Next, check the contact leaf and housing. The contact leaf affects electrical triggering; observe for deformation, displacement, or contamination, and avoid repeatedly moving it to change its shape. For the housing, check that the clips are intact and clean away dust, plastic debris, and other foreign objects to prevent affecting stem movement. If the Housing Clip is broken, continued long-term use is not recommended, as unstable assembly may alter the relative positions of the Stem, Spring, and Contact Mechanism.
How to Reassemble a Keyboard Switch After Opening?
When reassembling, install the Spring, Stem, Contact Mechanism, and Top Housing in that order. First, secure the Bottom Housing, then install the Spring and Stem, ensuring the Stem is correctly oriented and properly engages with the internal guide structure.
If a separate Contact Mechanism is included, ensure its position has not changed. Then install the Top Housing, ensuring the Housing Clips are accurately aligned with their fixed positions. After fully engaging, check for gaps from multiple directions. If the Clip is not fully locked, disassemble and inspect the internal components again, ensuring everything is correct before reassembling the PCB.
Check the Keyboard Switch Before Reinstalling
Before reinstalling, a manual test is recommended. Press the stem with your finger and observe whether it moves down smoothly and rebounds normally. Pay particular attention to the initial pressing force, the smoothness of travel, any resistance before bottom-out, and whether it quickly returns to its original position after releasing.
Press repeatedly to confirm that the mechanical feedback is consistent each time. After installation, perform an electrical test to confirm that the buttons register correctly and check for intermittent actuation or contact chatter. Only after both mechanical action and electrical triggering are normal should the switch be reinstalled on the PCB to reduce the risks associated with repeated disassembly and reassembly.
Mechanical Keyboard Switch vs. Magnetic Keyboard Switch: Is the Opening Method the Same?
Mechanical Keyboard Switches and Magnetic Keyboard Switches operate on different principles, therefore their disassembly methods differ. Mechanical switches primarily rely on the stem, spring, and mechanical contact mechanism for pressing and electrical triggering. Opening the housing allows for direct inspection and cleaning of related components.
Magnetic Keyboard Switches, however, require close attention to the magnet, its position, and the sensing component on the PCB. If the magnet’s position is misaligned or related components are damaged, reassembly may alter the actuation behavior. Therefore, Magnetic Keyboard Switches should not be disassembled in the same way as Mechanical Keyboard Switches; it is recommended to follow the manufacturer’s maintenance guidelines.

magnetic keyboard switch
FAQ
Q1. Why can’t the switch be forcibly disassembled before removing the keycap?
A1. Because pulling the switch directly without removing the keycap may subject the stem to additional lateral force, causing product damage.
Q2. Why is it not recommended to use unsuitable tools to pry open the housing?
A2. Tools of the wrong size or shape are likely to cause excessive localized force, damaging the housing or clips.
Q3. Why should the orientation of the spring and stem be considered after disassembly?
A3. Because the spring and stem are not perfectly symmetrical parts that can be installed arbitrarily. Incorrect installation orientation can lead to uneven stem movement, abnormal rebound, or changes in the overall feel.
Q4. Why are housing clips easily damaged during disassembly?
A4. This is generally due to using excessive force or not applying the tool accurately to the clips. Therefore, correctly positioning the keyboard switch opener is more important than simply applying more force.
Q5. Why is a trigger test still necessary after reassembly?
A5. Because a switch that can be pressed normally does not necessarily mean that the electrical contact is normal. Manually checking before reinstalling it on the keyboard and then performing an actual key press test after installation is a more reliable verification process.
Conclusion
A truly reliable disassembly process for a mechanical keyboard switch should follow a clear mechanical sequence: Remove Keycap → Remove Switch → Open Housing → Inspect Components → Clean or Maintain → Reassemble → Test. For a switch that has already been opened, it’s crucial to thoroughly inspect the stem, spring, metal contact leaf, and housing to ensure optimal mechanical feel and electrical performance.
From a keyboard switch manufacturer‘s perspective, it’s essential for users to understand the internal structure and proper disassembly methods when disassembling and maintaining the keyboard switch. For keyboard manufacturers, long-term stability of the keyboard switch should be a primary focus during product development. A well-designed and precisely assembled keyboard switch should not only provide a good typing experience but also maintain stable mechanical movement and reliable actuation performance over extended use.