
Blog
How to Fix a Mechanical Keyboard Switch Step by Step
The mechanical keyboard switch is the core component of a mechanical keyboard that enables key input. When a key becomes unresponsive, repeats keystrokes, has unstable triggering, sticks, or has an abnormal feel, the problem may originate from the keyboard switch itself, or it may be related to the keycap, PCB, socket, solder joints, or software settings.
In other words, not all malfunctions mean the keyboard switch must be replaced. A proper troubleshooting process can help determine whether the problem stems from the mechanical structure or electrical connections, allowing you to decide whether to clean, reinstall, or replace the mechanical keyboard switch. This article will guide you through a step-by-step troubleshooting and repair process for the mechanical keyboard switch, following a practical repair procedure.
What Are the Common Problems With a Mechanical Keyboard Switch?
Before starting repairs, it’s essential to determine the type of malfunction. Different malfunctions typically correspond to different areas of focus. Identifying the problem type first can prevent unnecessary disassembly.
Mechanical Keyboard Switch Is Not Registering Keystrokes
This typically manifests as no input after pressing a keycap, or requiring multiple presses to register the keystroke. If keyboard software and connection issues have been ruled out, the electrical connection between the mechanical keyboard switch and the PCB should be the primary focus of inspection. For hot-swappable keyboards, the problem might be a loose socket, a bent switch pin, or incomplete insertion into the PCB. For soldered keyboards, check the keyboard switch pins for poor soldering, cracks, or other connection issues with the PCB pads.
Additionally, damaged contacts inside the switch can also cause signal instability. In conclusion, button malfunction doesn’t necessarily mean the switch itself is damaged; the problem could lie elsewhere.
Mechanical Keyboard Switch Is Double Typing
Double tying is a common mechanical keyboard malfunction, manifesting as pressing a key once but producing two or more keystrokes. This may be related to contact bounce. A brief, rapid electrical fluctuation may occur during the switching of mechanical contacts, which is usually filtered out by the keyboard controller through a debouncing mechanism.
However, if the contacts of the mechanical keyboard switch are contaminated, worn, or have decreased contact stability, the probability of repeated keystrokes is likely to increase. Double tying can also originate from PCB or controller issues. Therefore, the source of the malfunction should be identified through testing before deciding whether to replace the switch.
Mechanical Keyboard Switch Feels Sticky or Rough
If pressing a key results in a sticky, jerky, slow-rebounding, or discontinuous friction, the problem is usually related to the mechanical structure.
Foreign objects entering the switch housing may affect the stem’s vertical movement; contamination or abnormal friction between the stem and housing can also alter the key feel. Deformation of the spring may affect return speed. If only a single key is malfunctioning, check if the keycap is deformed or interfering with surrounding structures.
Mechanical Keyboard Switch Has Inconsistent Actuation
Another more difficult problem to diagnose is inconsistent actuation, which manifests as the same key sometimes working normally and sometimes requiring a deeper press, and occasional missed triggers during continuous operation. This can be caused by internal wear and tear on the switch, contact contamination, oxidation, or mechanical damage, or by electrical issues such as poor soldering on the PCB or poor contact in the hot-swap socket.
Therefore, it is not recommended to immediately disassemble the keyboard switch when encountering this type of fault. Instead, the problem should be gradually located through replacement testing, keyboard testing tools, and visual inspection.
What Should You Check Before Fixing a Mechanical Keyboard Switch?
Test the Mechanical Keyboard Switch with a Keyboard Tester
First, use a Keyboard Tester to check if the keys register stably. Press the faulty key repeatedly and observe if the system correctly recognizes it each time.
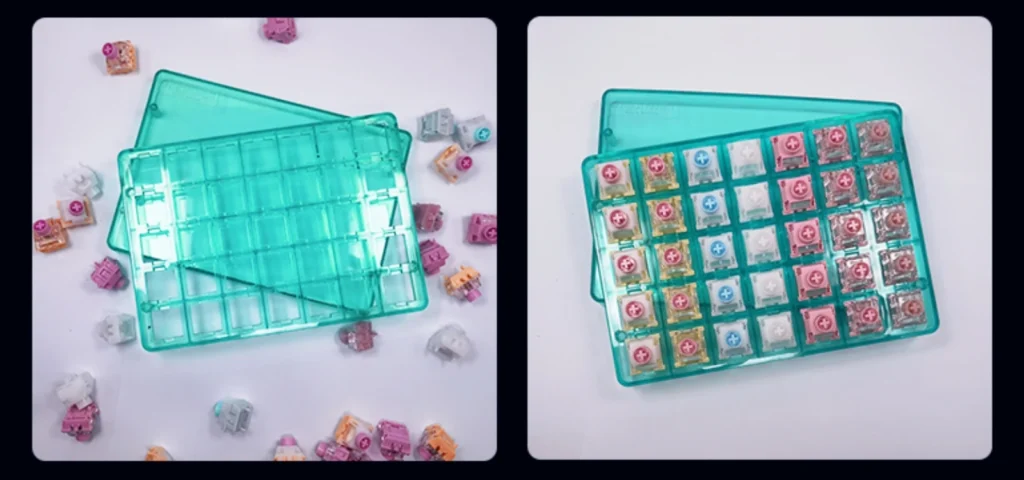
keyboard switch tester
If there is consistently no signal, further check the connection between the switch and the PCB. If it can be triggered but duplicate input occurs, determine if it is related to switch contact, debounce settings, or other electronic issues. It is best to test several working keys simultaneously for comparison, which can more intuitively determine if the fault is concentrated in a single switch.
Check the Keycap and Mechanical Keyboard Switch Installation
After removing the keycap using a Keycap Puller, you can directly observe the movement of the switch stem. When pressing the stem, if there is no obvious jamming and it rebounds smoothly, it indicates that the basic mechanical structure is not seriously abnormal.
At this point, check if the Keyboard Switch is correctly installed on the plate and PCB. Incomplete positioning may cause housing misalignment or poor pin contact. In addition, check if the keycap is installed at an angle and if the bottom of the keycap is mechanically interfering with the switch housing, plate, or surrounding keys.
Check the PCB, Hot-Swap Socket, or Solder Joint
For hot-swappable keyboards, focus on checking the hot-swap socket and switch pins. After removing the switch, check if the electrical pins are bent or misaligned to avoid poor contact after reinstallation.
For soldered keyboards, check the solder joints around the switch pins for cracks, cold solder joints, or loose connections, and any intermittent contact problems caused by these issues. Only after eliminating these external factors can you further determine if the mechanical keyboard switch itself is faulty.
How to Fix a Mechanical Keyboard Switch Step by Step
If you’ve determined the problem is primarily with the keyboard switch or its installation, follow these steps:
Step 1: Remove the Keycap From the Mechanical Keyboard Switch
First, turn off the keyboard and disconnect it. Use a keycap puller to remove the keycap. When removing it, apply force vertically upwards as much as possible, avoiding large left-right shaking of the keycap. If using a metal keycap puller, avoid directly scratching the keycap or impacting surrounding structures. After removing the keycap, try pressing the switch stem again to confirm if the problem persists.
Step 2: Inspect the Mechanical Keyboard Switch
For hot-swappable keyboards, use a switch puller to remove the keyboard switch from the plate and PCB; for soldered keyboards, you need to heat and melt the solder before removing the switch. Users without soldering experience should first master the correct switch removal and soldering procedures to avoid damaging the PCB (refer to a mechanical keyboard switch removal guide for details).
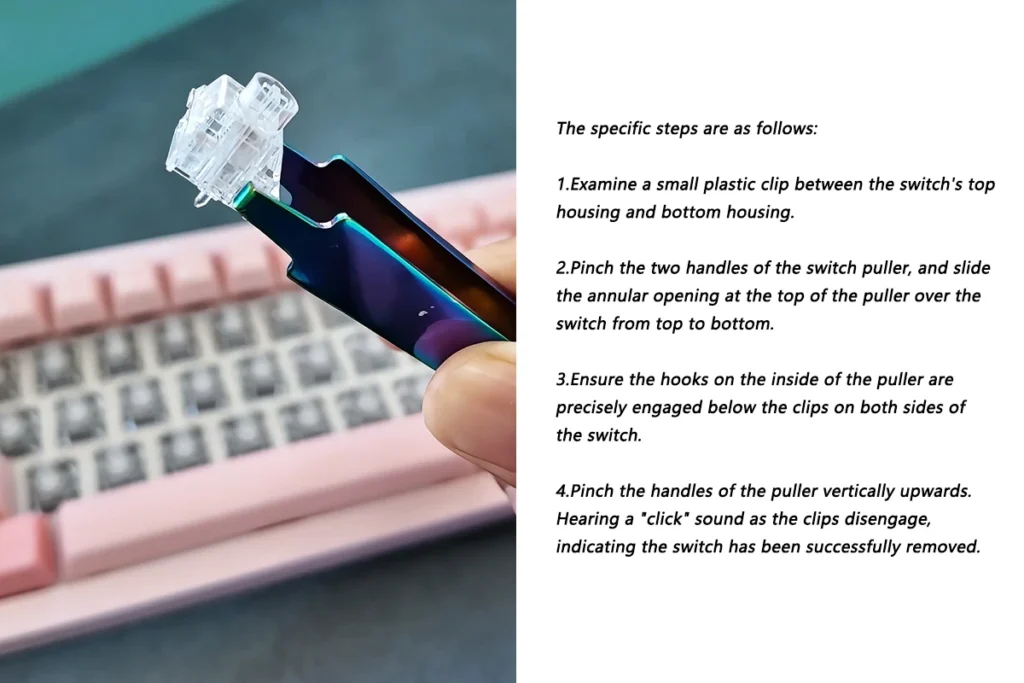
keyboard switch puller using guide
After disassembly, inspect the Housing, Stem, Spring, and Pins for cracks, deformation, breakage, misalignment, bending, contamination, or oxidation. If obvious mechanical damage is found, further forced repair of the internal structure is usually unnecessary.
Step 3: Clean the Mechanical Keyboard Switch
If the malfunction is mainly caused by dust, debris, or other contaminants, cleaning can be performed first. For switches without obvious internal damage, use appropriate methods to focus on cleaning under the Keycap, around the Switch, and areas that may affect Stem movement.
If using liquid cleaners, handle with caution. Do not spray large amounts onto the switches or circuit board without confirming their suitability for the switch and PCB, as residual liquid may affect the contacts and electronic components. After cleaning, re-check the Stem movement and rebound. If the Sticky Switch still does not recover, further assessment is needed to determine if there is wear or damage to the internal structure.
Step 4: Reinstall the Mechanical Keyboard Switch
When reinstalling the Mechanical Keyboard Switch, ensure that the Electrical Pins and positioning mechanisms are accurately inserted into the PCB or Socket. For hot-swap keyboards, check the pins for bending or misalignment before installation to avoid damage from forced insertion. After installation, ensure the switch housing is fully fitted to the plate to prevent significant tilting or looseness.
Step 5: Test the Mechanical Keyboard Switch
After reinstallation, do not immediately assume the repair is complete. Use a Keyboard Tester to check key registration again and press repeatedly.
Key observations: Does it trigger every time? Does double typing occur? Does the stem rebound normally? Has the key feel been restored? If the electrical input is normal, but there is still significant sticking or abnormal rebound, it indicates a problem with the mechanical structure.
Can You Repair a Mechanical Keyboard Switch Without Replacing It?
Not all malfunctions require replacing the mechanical keyboard switch. If the problem stems from dust, improper installation, bent pins, or mechanical interference, cleaning, adjustment, and reinstallation may restore normal function. However, if the contact, spring, stem, or housing is substantially damaged, external cleaning alone is unlikely to restore long-term stability. Therefore, during repair, the focus should be on determining whether the keyboard switch can maintain stable actuation and contact reliability.
When Cleaning Can Fix a Mechanical Keyboard Switch
Cleaning is primarily applicable to malfunctions caused by dust, debris, and minor contamination. For example, dust causing stem friction, or foreign objects affecting the normal movement of the keycap or stem. In these cases, removing the contaminants will improve pressing and rebound. However, if double typing, missed triggers, or abnormal rebound persist after cleaning, further inspection of the switch’s internal structure and electrical connections is necessary, and it cannot be simply attributed to dust.
When a Mechanical Keyboard Switch Should Be Replaced
If contact damage, broken stem, deformed spring, or severe wear is found, replacement is usually more reasonable than attempting to repair the internal structure. Especially for switches that have been used for a long time, from a repair cost and reliability perspective, a new mechanical keyboard switch is often more manageable than repeatedly repairing damaged internal components.
How to Replace a Faulty Mechanical Keyboard Switch?
When it’s confirmed that the switch cannot be restored to stable operation through cleaning or reinstallation, replacing the switch is usually the next step.
Replacing a Hot-Swappable Mechanical Keyboard Switch
Replacing the switch on a hot-swap PCB requires no soldering. First, use a keycap puller to remove the keycap, then use a switch puller to remove the faulty switch, and check if the hot-swap socket is normal. Also, confirm that the two pins of the new keyboard switch are not bent.
During installation, pay attention to the switch’s orientation and positioning structure, ensuring the pins align with the socket. After reinstalling the keycap, use a keyboard tester to check the input. If the new switch works normally but the original switch fails, the fault is likely from the original switch.
Replacing a Soldered Mechanical Keyboard Switch
Replacing the switch on a soldered keyboard is more complex. It requires heating the solder joints to melt the solder before removing the old keyboard switch. After disassembling, inspect and clean the PCB pads, install the new switch, and resolder.
For users without soldering experience, repeatedly heating the PCB is not recommended. Excessive heating time or improper handling can damage the PCB pads, increasing the difficulty of subsequent repairs.
How to Choose the Right Mechanical Keyboard Switch Replacement
When selecting a mechanical keyboard switch, confirm the Actuation Force, Actuation Point, Total Travel, Switch Type, Pin Configuration, Mounting Type, Mechanical Life, and overall compatibility.
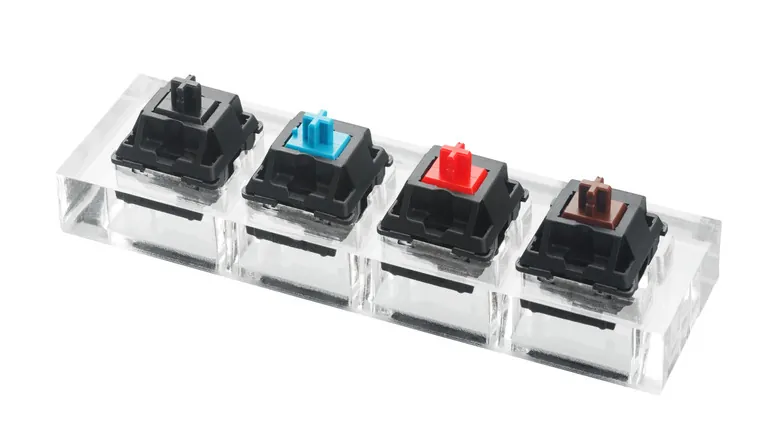
different types of mechanical keyboard switches
Pin Configuration and Mounting Type determine installation compatibility, while Force, Actuation Point, and Travel affect the input experience. If only replacing some faulty switches, also check if the spring characteristics and pressing feel of the new and old switches are consistent.
How to Test a Mechanical Keyboard Switch After Repair?
Test Mechanical Keyboard Switch Actuation
First, check the actuation: Press the button continuously with normal force to confirm that the switch can be stably triggered without significantly increasing the pressing force. Also check the stem return. If the switch cannot quickly return to its initial position after releasing the button, there may still be mechanical structural problems such as spring, stem, or housing issues.
Check Mechanical Keyboard Switch Repeatability
Repeatability is an important indicator of repair quality. For the repaired switch, press it dozens or even more times continuously to observe for missed triggers, false triggers, double typing, or occasional unresponsiveness. If random failures still occur during continuous testing, the switch, socket, and PCB should be further inspected.
Compare the Repaired Mechanical Keyboard Switch With Other Keys
Finally, compare the repaired switch with adjacent normal keys. Besides whether it can input, compare press feel, operating force, return speed, and sound. If the newly installed keyboard switch differs significantly from the original keyboard switch in these aspects, the overall keyboard experience may become inconsistent.
Conclusion
Repairing a mechanical keyboard switch should not begin with “directly replacing the switches,” but should proceed in the following order: Identify the Problem → Inspect → Clean → Reinstall → Test → Replace if necessary. For simple installation errors, dust contamination, and minor contact issues, cleaning, adjustment, and reinstallation can be attempted. However, if the switch exhibits contact damage, broken stem, deformed spring, or severe wear, replacement with a new mechanical keyboard switch is recommended.
When replacing a mechanical keyboard switch, a comprehensive consideration should be given to switch compatibility, actuation force, actuation point, travel, mounting type, mechanical life, and contact reliability. From a keyboard switch manufacturer‘s perspective, a reliable mechanical keyboard switch not only needs to have good actuation performance when new, but also needs to maintain stable mechanical movement, contact condition, and operational consistency after long-term repetitive operation.